Setting Up a Data Science Development Environment with Python and Jupyter
This post walks through the configuration of a basic local development environment for data science work with Python and Jupyter. No prior system configuration is assumed.
Setup
The first step in the setup for this environment is installing Python. There are plenty of resources available describing how to install Python, so we won’t go into the details here; instead, I’ll just point out a few good places to start:
- Installing Python on Windows
- Installing Python on OSX
- Installing Python on Ubuntu Linux
Before proceeding, we’ll verify our Python installation to make sure that everything is working as expected.
On Windows, you should see something like the following:
> python --version
Python 3.8.3
> where python
C:\path\to\user\profile\AppData\Local\Programs\Python\Python38\python.exe
If you’re unable to invoke python from a command prompt (cmd.exe) you may need to modify your PATH environment variable. To do this, navigate to System Properties within the control panel and select `Environment Variables near the bottom of the window. Once there, select Path and click Edit. Add the following filesystem paths to the list that appears:
C:\Users\YourUserName\AppData\Local\Programs\Python\Python38\Scripts\C:\Users\YourUserName\AppData\Local\Programs\Python\Python38\
Once complete, make sure to apply the changes. You will need to restart your command prompt in order for the changes to take effect.
On OSX or Ubuntu Linux, we can verify our Python installation in a similar manner:
$ python --version
Python 3.8.3
$ which python
/usr/bin/python
On both of these systems, the package manager (homebrew on OSX, apt on Ubuntu) should take care of all of the path environment variable management for you by installing Python in a location that is already accessible from our shell.
Note that your Python version may differ from the output above. This is fine, so long as the major version is Python 3 and not Python 2.
The next step is to install pipenv, the latest in the long line of Python virtual environment systems. A Python virtual environment is an isolated Python development context that, among other things, maintains its own version of the Python interpreter and manages installed Python packages locally. This greatly simplifies the package-management process when switching between multiple projects because we don’t pollute the global collection of Python packages (those accessible from anywhere on the system) with dependencies that are project-specific.
We can install pipenv with the Python package manager pip.
On Windows, run the following command to install pipenv and subsequently verify that the install succeeded:
> pip install --user -U pipenv
> pipenv --version
pipenv, version 2020.8.13
The --user flag simply specifies that we want to install pipenv for our user profile only, rather than for all users on the system. For most people using a personal computer that is not shared by others, this doesn’t actually make a huge difference. The -U flag ensures that we install the most up-to-date version of the package.
On OSX and Ubuntu Linux, we want to avoid updating our PATH, so we’ll opt for a global installation of pipenv. This will ensure that the pipenv command is accessible from our shell.
$ sudo -H pip install -U pipenv
$ pipenv --version
pipenv, version 2020.8.13
Now the baseline requirements are out of the way, so we’ll move onto setting up the specific requirements for our Python data science development environment. First we’ll create a directory that will serve as the root project directory for our data science projects. For the purposes of this post, I’ll refer to this directory with the name cds for “computational data science.”
> cd path/to/dev/directory
> mkdir cds && cd cds
Now, within this directory, we can create a new virtual environment for all our data science projects with pipenv, installing JupyterLab and its associated components within this virtual environment. JupyterLab includes a large number of dependencies so this installation will likely take a few minutes.
dev/cds> pipenv install jupyterlab
...
After the install completes, we need to enter the virtual environment context by activating the virtual environment with pipenv:
dev/cds> pipenv shell
Launching subshell in virtual environment…
...
(semirandom-virtualenv-id) dev/cds>
A virtual environment maintains unique copies of the Python interpreter and the Python package manager pip. You can verify this with the following commands.
On Windows you should see output similar to the following:
(semirandom-virtualenv-id) dev/cds> where python
C:\path\to\user\profile\.virtualenvs\semirandom-virtualenv-id\Scripts\python.exe
C:\path\to\user\profile\AppData\Local\Programs\Python\Python38\python.exe
(semirandom-virtualenv-id) dev/cds> pip --version
pip 20.1.1 from C:\path\to\user\profile\.virtualenvssemirandom-virtualenv-id\lib\site-packages\pip (python 3.8)
Notice that the output from python --version on a Windows system will likely display two distinct paths to a Python interpreter. The ordering of the paths here matters: the fact that the path to the Python installation within our virtual environment precedes the global Python installation means that when we invoke python within our virtual environment, the virtual environment’s interpreter will be preferred over the one provided by the global installation.
On OSX or Ubuntu Linux the output should instead resemble:
(semirandom-virtualenv-id) dev/cds$ which python
/path/to/user/profile/.local/share/virtualenvs/semirandom-virtualenv-id/bin/python
(semirandom-virtualenv-id) dev/cds$ pip --version
pip 20.1.1 from /path/to/user/profile/.local/share/virtualenvs/semirandom-virtualenv-id/lib/python3.8/site-packages/pip (Python 3.8)
Here, only the path to the Python interpreter within the virtual environment context is shown.
The final setup step is registration of the virtual environment Python interpreter as a new kernel within JupyterLab. This allows us to create new notebooks or load existing notebooks from within JupyterLab in the context of our virtual environment so that any packages we install therein will be accessible within the notebook.
To register the virtual environment as a new kernel, run the following command:
(semirandom-virtualenv-id) dev/cds> python -m ipykernel install --name=cds
Installed kernelspec cds in some/os/specific/path/jupyter/kernels/cds
This registers a new kernel under the name cds; the name is immaterial, but choosing a name for the kernel that matches the name of the virtual environment with which it is associated may help to keep things organized in the event that you plan to eventually utilize multiple kernels with multiple virtual environments.
Verification
Now that setup is complete, let’s run through a quick test to ensure that everything is working as expected. To do this, we’ll install a package within the virtual environment and make sure that we can use it successfully in a new JupyterLab notebook.
For demonstration purposes, we’ll use the numpy package. First, with the virtual environment activated (see above), install the numpy package with:
(semirandom-virtualenv-id) dev/cds> pip install numpy
Equivalently, you can run:
(semirandom-virtualenv-id) dev/cds> pipenv install numpy
Both commands install the numpy within our virtual environment only and do not pollute our collection of globally-installed Python packages.
Next, launch JupyterLab in the browser with:
(semirandom-virtualenv-id) dev/cds> jupyter lab
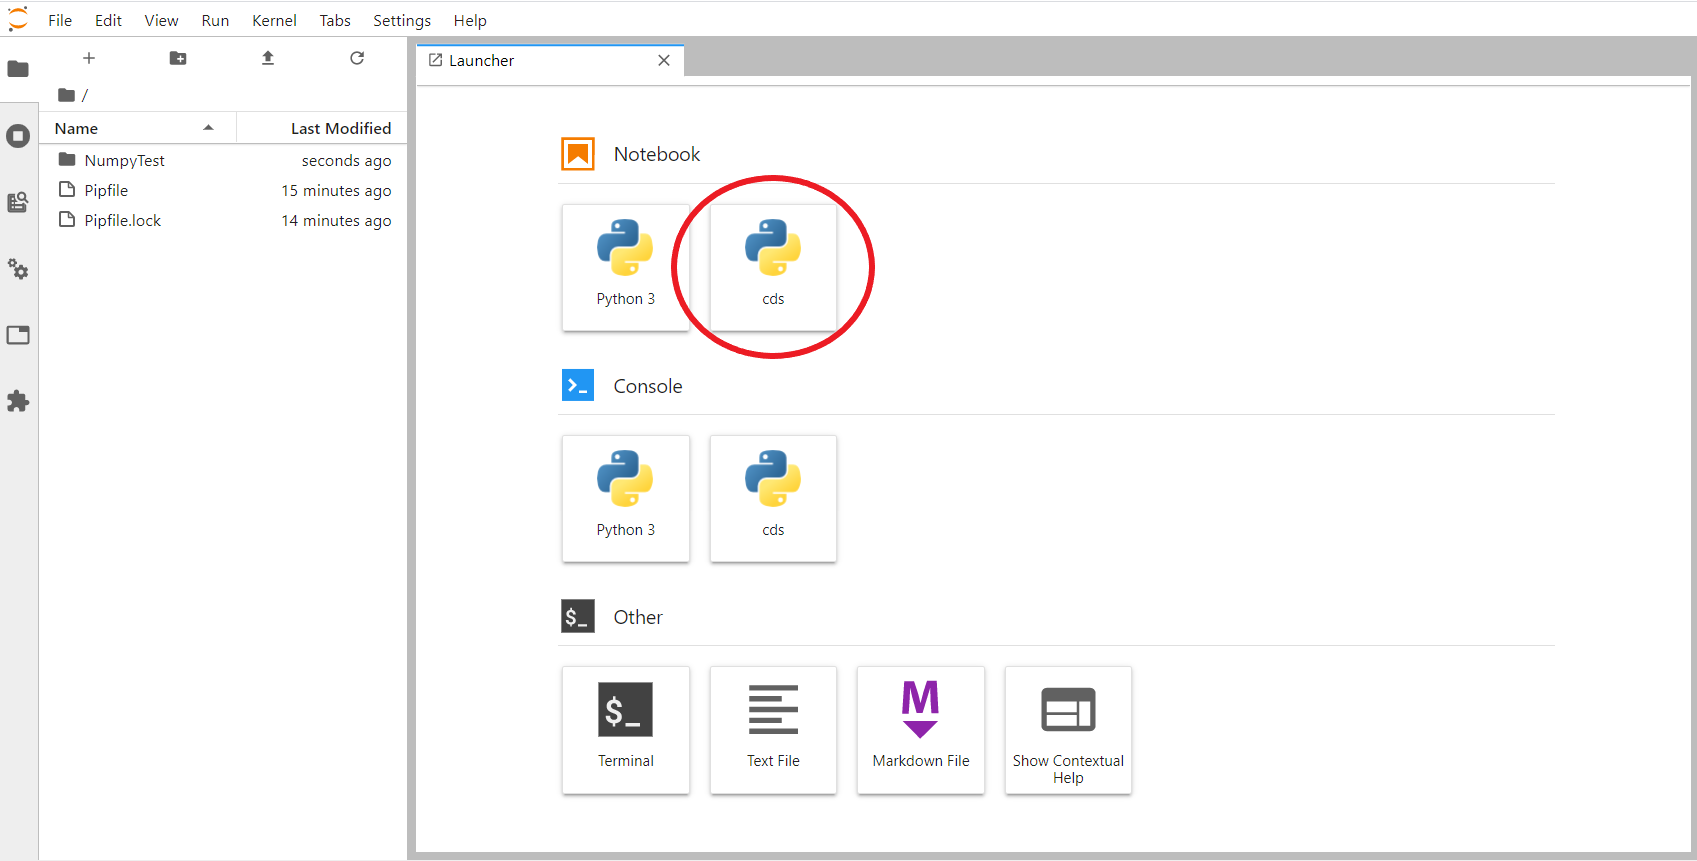
From the JupyterLab interface in the browser, create a new notebook by selecting our custom kernel from the menu of available kernels:
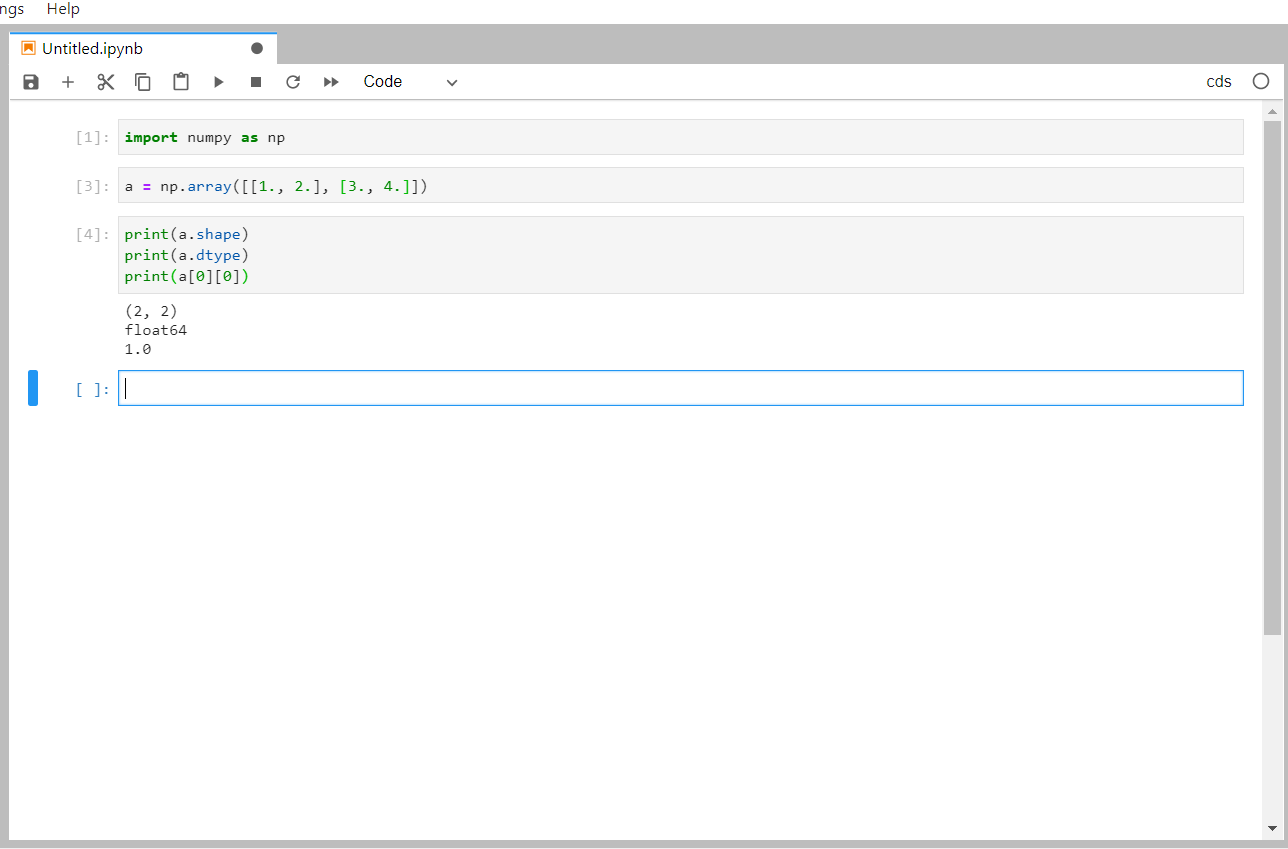
In the new notebook, you should be able to import the numpy package and make use of it in subsequent cells:
Finally, when you are done working and want to exit the virtual environment context within the shell, just run:
(semirandom-virtualenv-id) dev/cds> exit

Aborted!
Success! Now whenever we need to install new packages such as pandas or scikit-learn we can simply activate our data science virtual environment and pip install them without worrying about versioning issues with other projects on our system, and furthermore we can easily recreate our development environment anywhere with the help of the Pipfile.lock that is automatically updated whenever we install, update, or remove dependencies.