Container Deployment on AWS
This post describes several options for deploying containerized applicatons on AWS and the tradeoffs in terms of usability, scalability, and pricing.
Overview
All major cloud service providers present services for deploying containerized applications. Amazon Web Services (AWS) is no exception. In fact, this post was inspired by a recent article that discusses 17 distinct ways to deploy containers on AWS. With all of these available options, how do we select the one that is most appropriate for our particular application?
As you might expect, there are tradeoffs present across these container deployment offerings. The way these tradeoffs align with the particular requirements of our application determines the deployment option we select. In this post, we explore several options for container deployment on AWS, and compare their characteristics that are relevant to making a deployment decision.
We consider usability. This is the relative level of difficulty involved in deploying and managing the service. I will also use the term complexity to refer to this metric throughout this post.
We also consider scalability. These are aspects of the deployment option that influence the service’s ability to cope with increasing load. Scalability considers both the ease with which the deployment can be expanded (e.g. are auto-scaling and load-balancing included?) as well as the capability of the service to cope with faults (e.g. are containers that are killed automatically repopulated?).
Finally, we consider pricing. This is the complexity of the pricing model that AWS uses for the deployment option, as well as the relative cost of the resources we get.
The methods we will consider are listed below, roughly in order of complexity.
Throughout this post I will use a machine learning inference service as an example application, but the concepts are generalizable to other containerized applications. The inference service in this example provides movie recommendations for users over HTTP(S). An example request to the service looks like:
curl https://<PATH.TO.HOST>/recommend/<USER_ID>
The expected response is a comma-separated list of movie identifiers.
This post is intended for a (relatively) general audience. I provide an appendix at the end of this post with some additional technical details for those who would like to follow along and try out these services themselves.
Why Containers?
Containerization takes some additional work beyond development of your application. Why should we bother with containers at all? What problem do they solve?
Deploying software is difficult. Differences between the development and the runtime environment, as well as difference among runtime environments makes it challenging to ensure that our applications will run consistently everywhere. Furthermore, packaging the dependencies of our applications also poses a challenge. Should we rely on the user to install dependencies before they run our application? Should we download and install these dependencies on the local system during application startup? Neither of these options provides a particularly attractive user experience.
Containers solve these issues of heterogenous deployment environments and dependency management, thereby simplifying software deployments. Once we have packaged our application within a container, we can rely on a single, common interface (the container runtime) between our application and the underlying resources on which it executes. Our application can run anywhere a container runtime is available with the guarantee that the execution environment is the same as when we tested it locally and that all dependencies will be available.
AppRunner
AWS AppRunner is a fully managed container deployment service. With AppRunner’s high-level API, nearly all of the details of infrastructure management are hidden from us. To deploy a container with AppRunner, the only required piece of information is the URI of the image on ECR. The service also provides some options for more advanced configuration of our deployment, including:
- vCPU and Memory
- Autoscaling Policy
- Health Checks
- Security
- Networking
However, all of these configuration options come set with reasonable defaults. I found that the entire process of deploying an application on AppRunner takes just 30 seconds to click through, but the subsequent deployment of the service can take some time (~3 minutes).
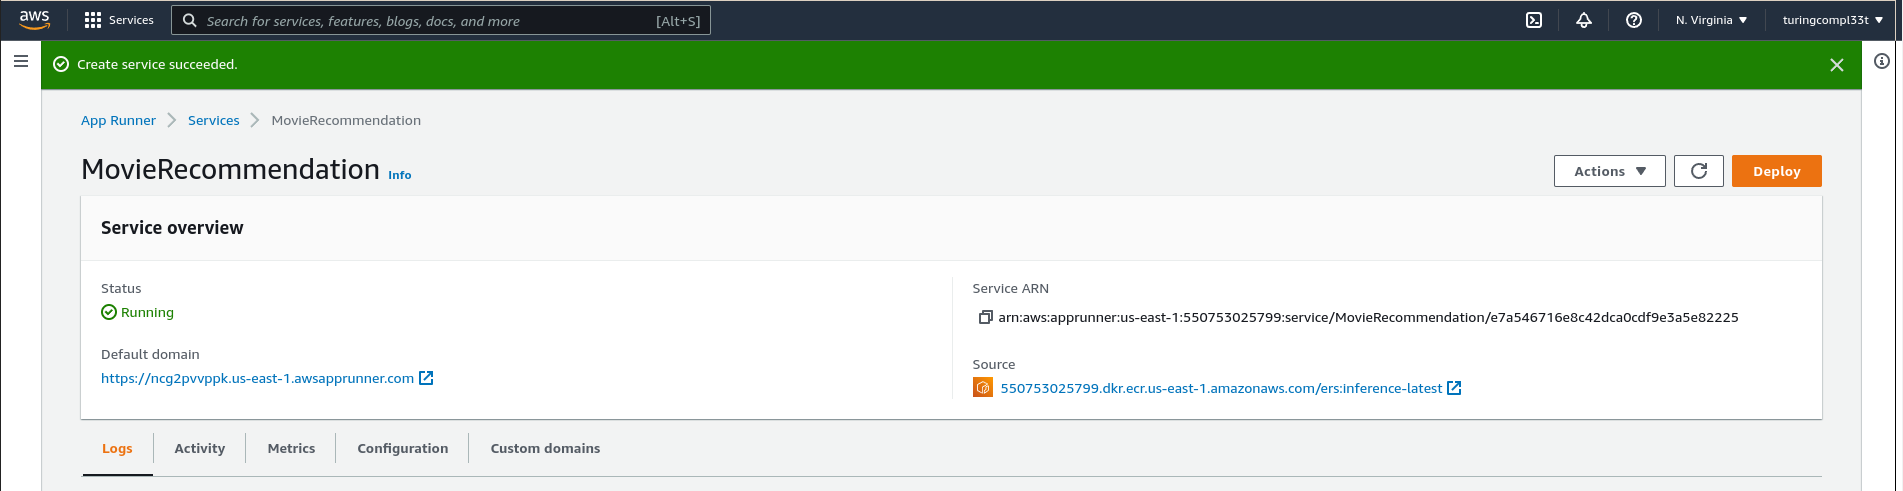
Once the service is running, AppRunner provides us with a public address that we can use to make inference queries. We can hit this address with a request to verify that the deployment is working as expected
curl https://pbueku8vmz.us-east-1.awsapprunner.com/recommend/0
Clearly, the setup for AppRunner is simple and can be completed quickly, without prior experience in cloud computing technologies. This is a major benefit of this service.
From a scalability standpoint, the AppRunner service provides builtin auto-scaling and load-balancing. This makes scaling deployments of containers on AppRunner extremely simple, and provides reasonable guarantees that our service will remain available once deployed. Additionally, AppRunner supports automatic re-deployment of our service whenever a new image is uploaded to the image repository. This makes versioning of the service relatively simple.
As the pricing page for AppRunner explains, we pay for both compute and memory resources used by our application. The page also provides a detailed cost breakdown for some sample workloads. One of these workloads, the Lightweight, Latency-Sensitive API seems particularly appropriate for our use case of a movie recommendation service, and the calculations from AWS estimate the cost of this workload at $25.50 per month. The pricing model is not particularly simple, but these sample calculations can give us a good indication of how much it might cost to deploy a service of our desired scale with AppRunner.
AppRunner is not without its drawbacks, however. The configurability of the service is remarkably low. This is obviously a design choice for the service, but the fact remains that AppRunner does not allow fine-grained control of your infrastructure. This makes things like multi-container deployments difficult.
Conclusion AppRunner is a convenient way to get containers running on the cloud quickly. I would use AppRunner during development of a containerized application or in an academic setting. For a production deployment, however, I believe the level of control and visibility offered by AppRunner is insufficient.
Lightsail Containers
AWS Lightsail is a virtual private server (VPS) offering from AWS. Lightsail is similar in some ways to infrastructure offerings (such as EC2) in that it provides direct access to a virtual server in the cloud. However, Lightsail differentiates itself by providing a higher-level API to raw computing resources, presenting a less-involved web interface for new deployments and a simpler pricing model.
Lightsail introduces the concept of Container Services on top of its VPS offering. Based on the description in the blog post that introduced this feature, this is largely a bundling of existing services such as Lightsail VPS, Application Load Balancers (on EC2), and managed Relational Database (RDS) instances. For us, this means that we can specify the container image that we want to run and the resources that we want to allocate to it and Lightsail takes care of the rest.
Like AppRunner, the setup process for Lightsail containers is relatively simple. Once we select the container image, we are given an option for the power of the nodes on which our containers run as well as the scale (or number of nodes) of the service.
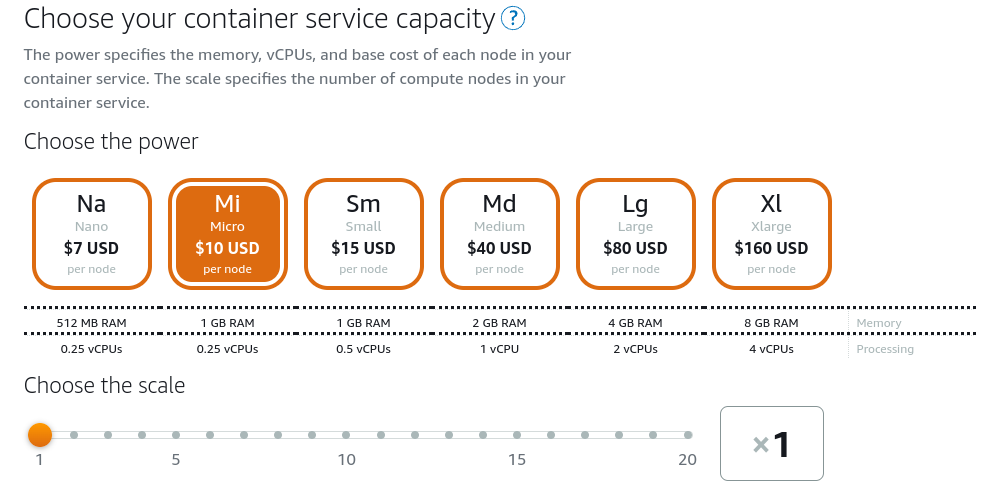
This is a coarse-grained pricing model relative to AppRunner (and some of the other services we will see later). This has the benefit of making it easier to reason about the cost of deploying with Lightsail, but has the drawback that we pay for resources regardless of their utilization.
Once we have a deployment running on Lightsail, we are presented with a dashboard with the details of our service.
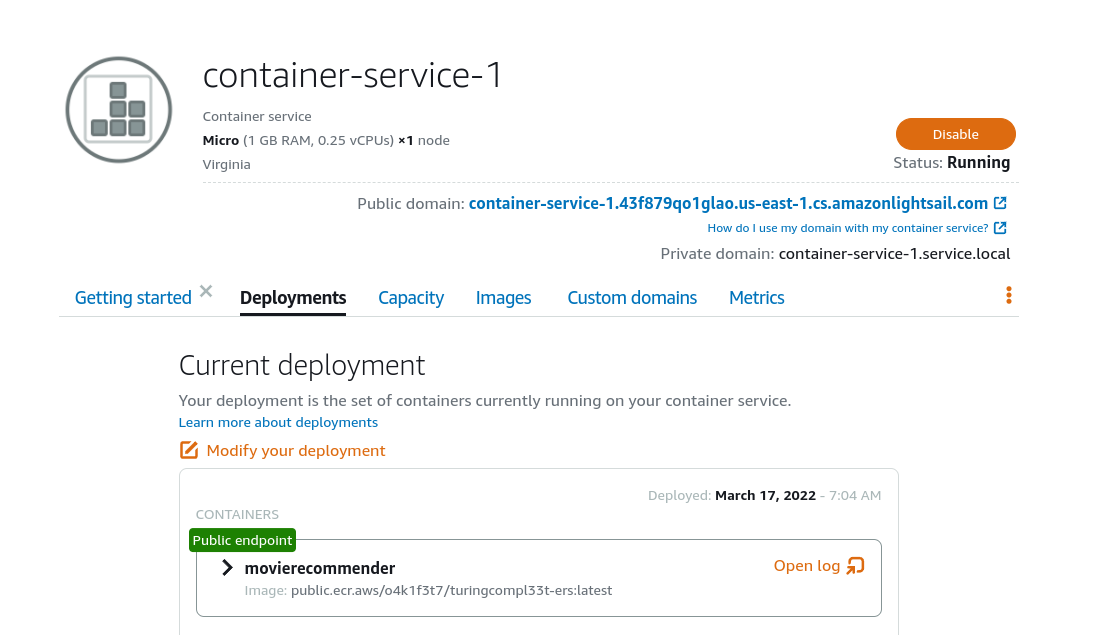
Lightsail provides a public address for our deployment that we can use to verify that it is operating as expected:
curl https://container-service-1.43f879qo1glao.us-east-1.cs.amazonlightsail.com/recommend/0
From a scalability standpoint, Lightsail leaves much to be desired. It does not provide automatic scaling of infrastructure to cope with increased load. However, it does allow for manual scaling after a deployment has taken place. Furthermore, it automatically, provides load balancing among individual nodes via an AWS Application Load Balancer.
Lightsail provides some additional flexibility that is missing from AppRunner. Specifically, Lightsail Containers supports multi-container deployments wherein we want to deploy a set of heterogenous container images at the same time. This is a scenario that might be commonly seen in microservice architectures.
Conclusion Lightsail improves on the shortcomings of AppRunner in some ways. The service abstraction allows us to scale our deployment beyond individual containers, which is likely a critical aspect in many production deployments. However, it falls at an awkward spot on the container deployment offering spectrum. For development I would use AppRunner over Lightsail Containers, while for anything more mature than development I would default to ECS (see below). For this reason, I am not convinced of the utility of Lightsail in container deployments.
Lambda
Lambda is a lightweight, serverless compute offering from AWS. With Lambda, we define functions that are invoked in response to events. These functions may be authored in one of several programming languages (e.g. Python, Java, JavaScript) run on cloud infrastructure managed by AWS.
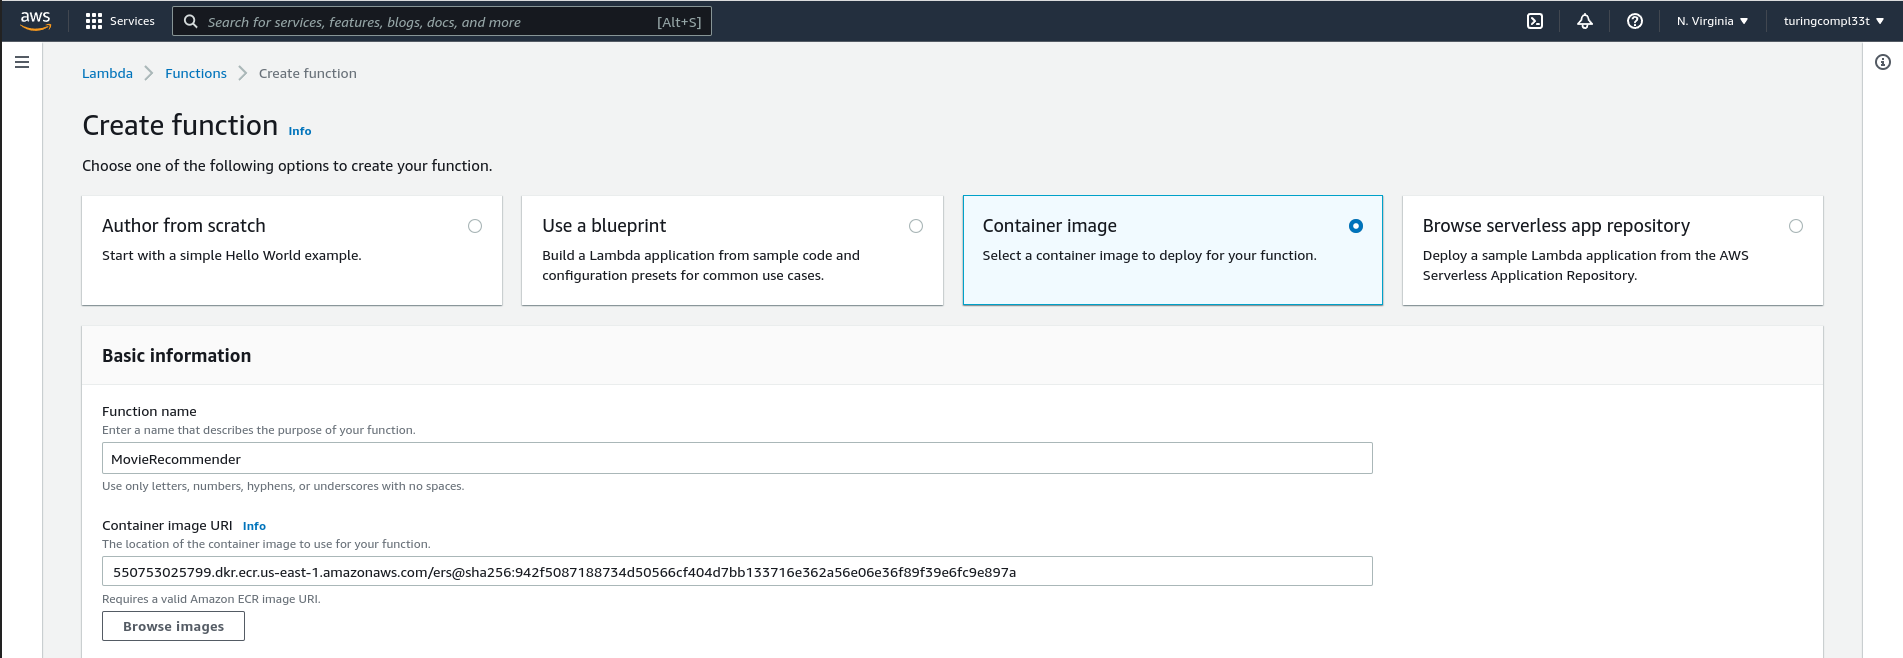
Until recently, Lambda only supported executing cloud functions distributed in a custom format defined by AWS (deployment packages), but now Lambda also supports cloud functions distributed as Docker containers.
The function interface defined by Lambda is slightly difference from the web (HTTP) interface we have assumed thus far in this post. This necessitates modifying some logic of your application is you want to deploy a containerized web service with Lambda Containers. Furthermore, a container that executes on Lambda requires some additional dependencies beyond those of your application, namely the Lambda Runtime Interface package. This requires modifying the process by which you build your container image to work with Lambda. See this post for additional details on the changes required when building a container image for deployment on Lambda.
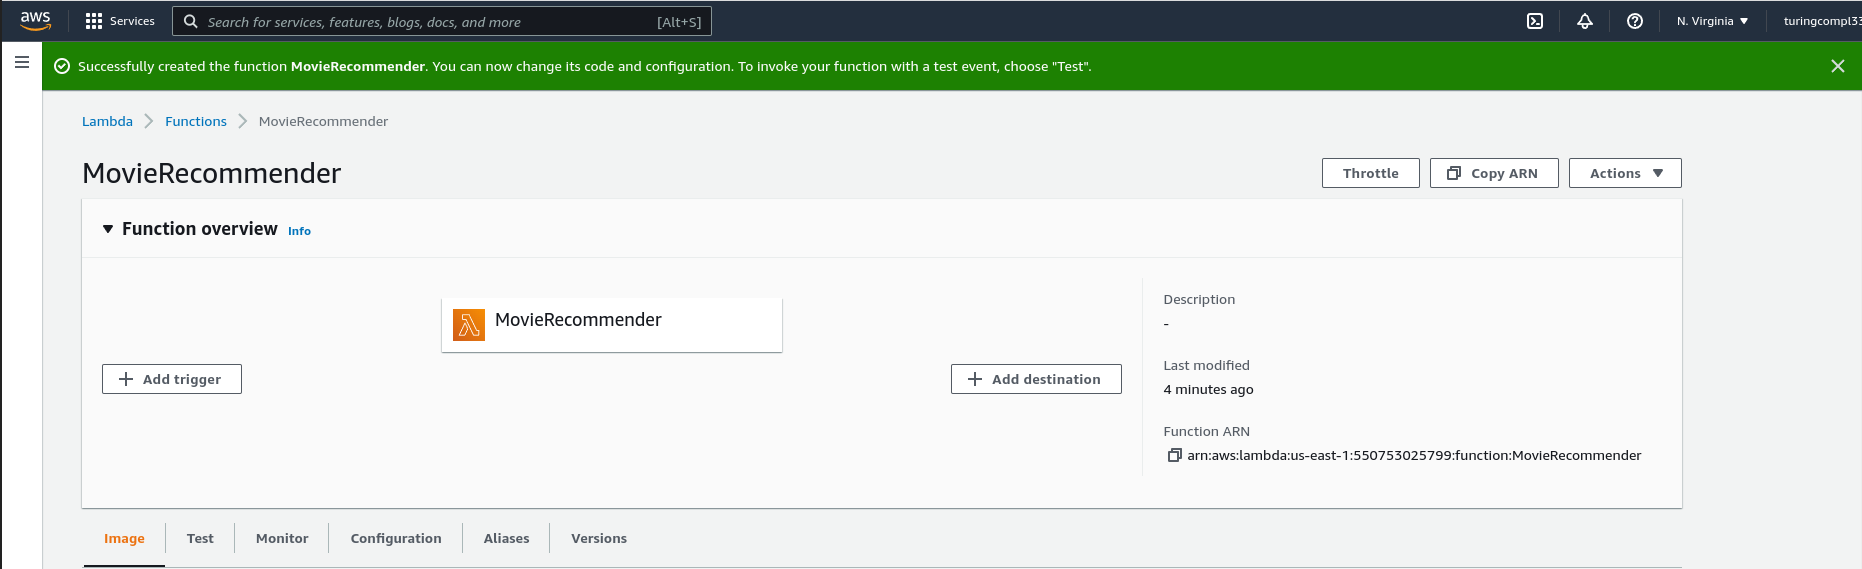
Once we have a properly-built container image, we can deploy it on Lambda in just a few moments. The interface for function creation is just a single page:
Function creation typically completes quickly. The interface for a deployed function includes mechanisms for monitoring function activity and deploying new versions of the function.
Once the function is created, we must expose the function over HTTP with the help of Amazon API Gateway. Again, I defer to this post for specific instructions on setting up API Gateway for use with a Lambda.
With Lambda, we provision resources dynamically. Lambda manages instances of our containers in the background, spinning up more resources to service requests when necessary (up to a configurable limit) and spinning them down again when demand declines. This is in contrast to an offering like Lightsail Containers wherein we pay the cost of the infrastructure no matter what the current load on the system is. This feature also has implications for scalability in that AWS automatically handles scaling and load-balancing on our behalf.
This scaling mechanism also has implications for pricing. With Lambda, we only pay for the resources that we use. When demand for our service is low, we do not pay for provisioned resources, which greatly improves utilization and thus the cost-efficiency of the service. However, Lambda does include additional charges for each invocation of the function on top of the resources provisioned to handle the requests. This makes deploying large services with Lambda less cost effective than other options like ECS (see below).
Conclusion Like AppRunner, Lambda is a great option for deploying individual containers, but not necessarily for deploying an entire container infrastructure. Lack of builtin support for multi-container deployments and the constraints imposed by the Lambda function API makes composing Lambda with other services difficult, relative to other available container deployment options.
ECS
AWS Elastic Container Service (ECS) is among the most flexible and powerful options for deploying containers on AWS. ECS is similar to Kubernetes (and therefore the Kubernetes offering on AWS, EKS) in that it abstracts the notion of container services away from the underlying resources on which the services run, but it takes a somewhat lighter-weight approach. I find ECS simpler to work with in many respects (e.g. initial setup, management) than EKS, although the tooling available for working with Kubernetes may tip the scales in the other direction.
With ECS, we define our service in (roughly) two stages:
- Describe the containers that implement our application logic
- Describe the resources (compute, memory, storage, etc.) on which we want these containers to run
AWS provides options for deploying ECS services on many different resources, including manually-constructed clusters of EC2 instances and a serverless compute option called Fargate. Without Fargate, we must manually manage the cluster of instances that run our containers. With Fargate, however, we never worry about individual instances, and instead we simply define the resources that our container service needs and allow Fargate to handle the process of allocating these resources for us. This is the approach we will take in our deployment.
With the power and flexibility of this approach comes complexity. Setting up an ECS container service on Fargate requires significantly more configuration effort than the other options for deployment we have seen thus far. For this reason, I find it useful to automate much of the process with an infrastructure automation tool like Terraform. We omit the details here, but see the appendix for more.
Once the service is running, ECS provides us with an interface that describes both the cluster as well as all of the services that we have running on it. Currently, we have a single movie recommendation service deployed to the cluster.
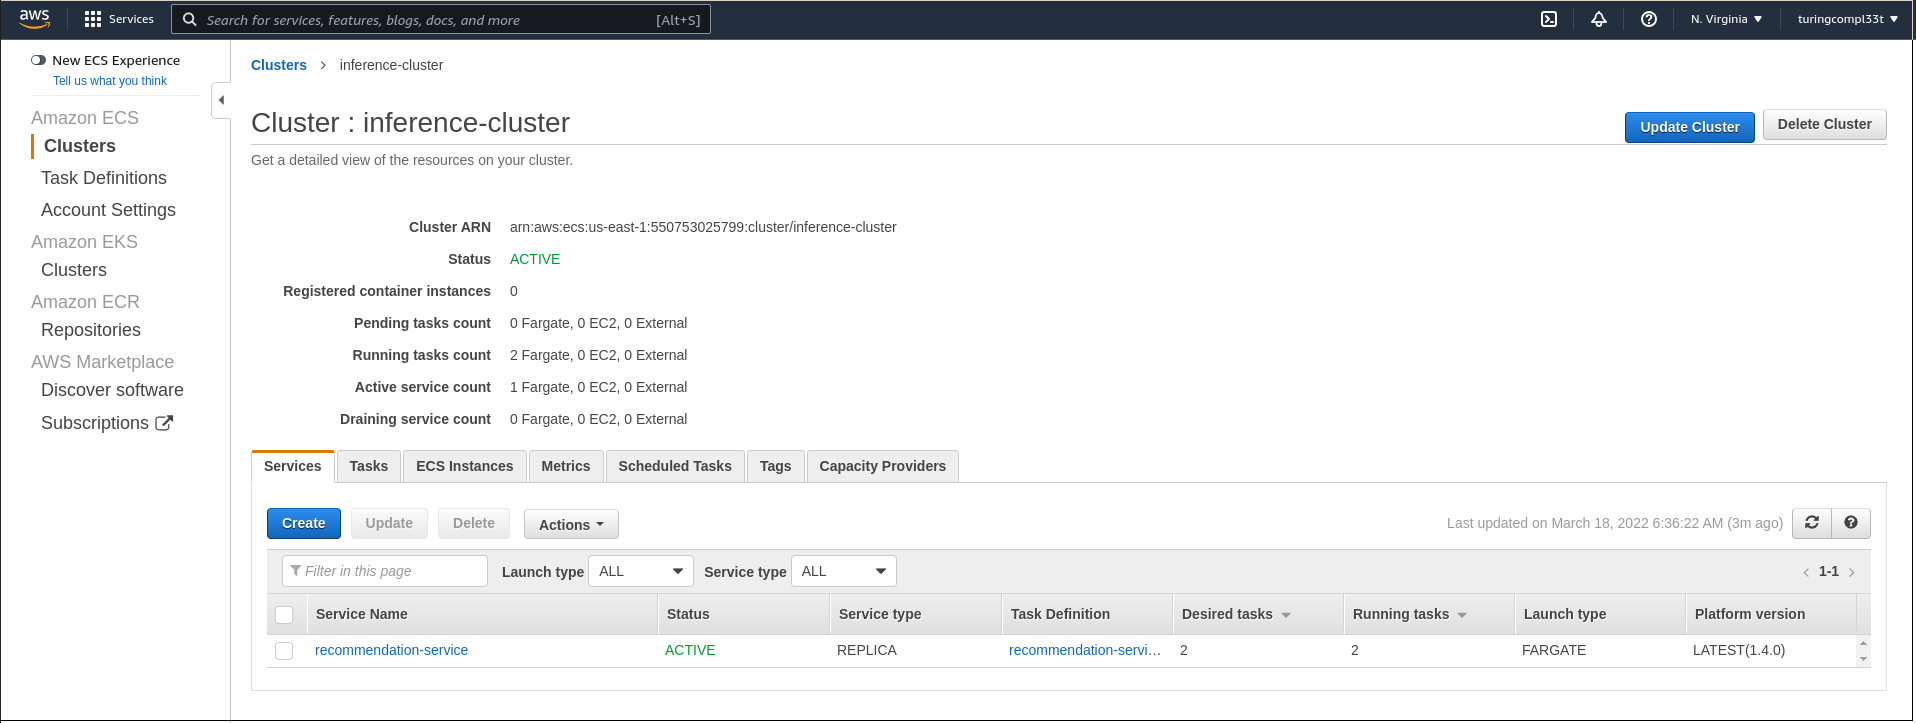
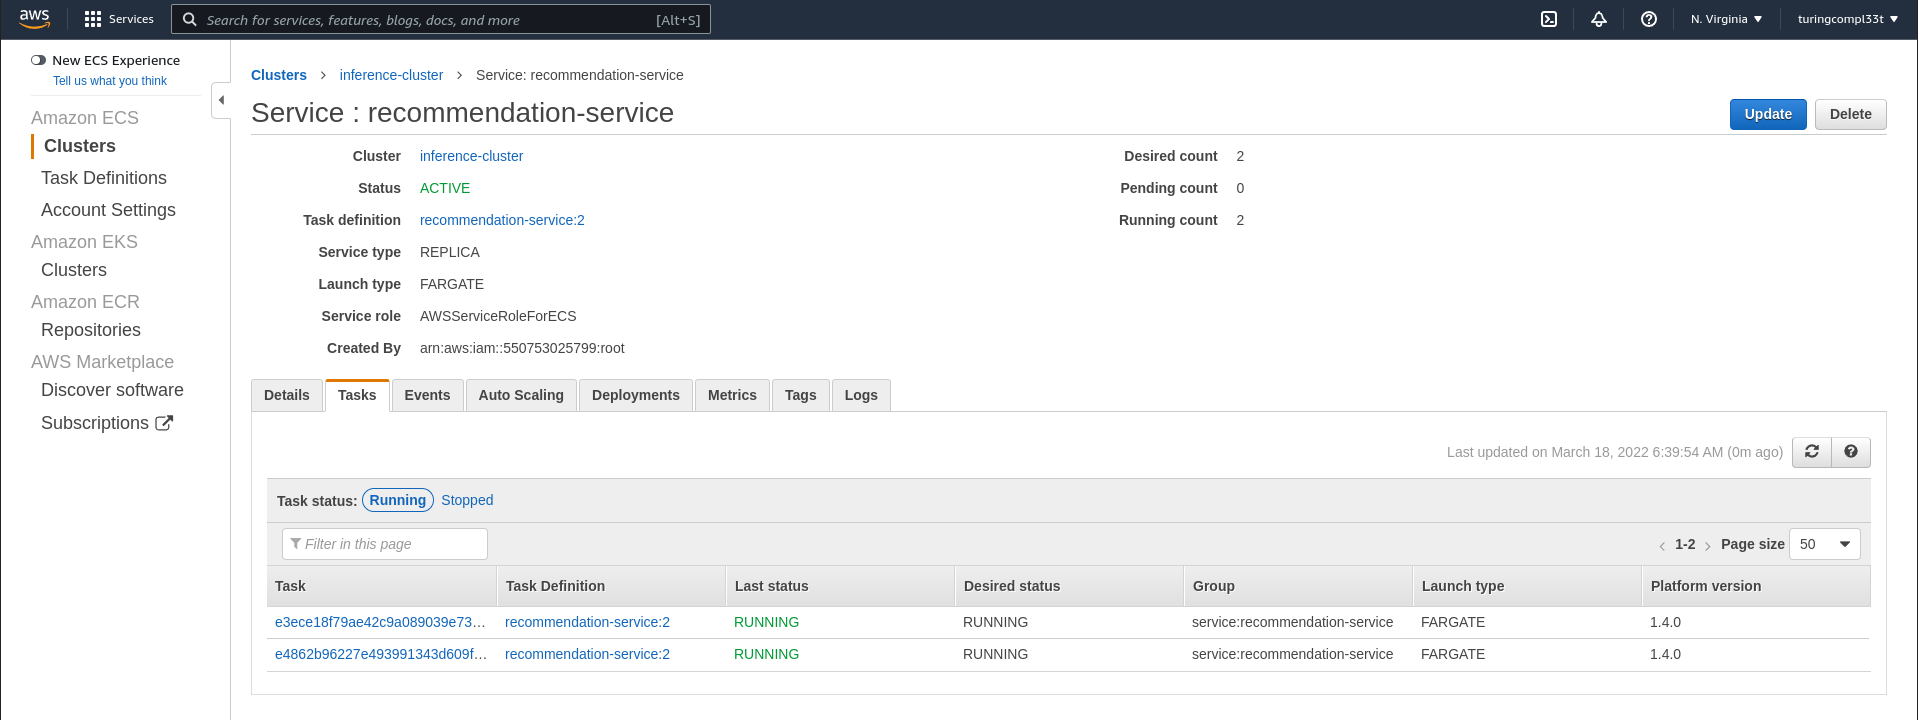
We can navigate to the service to see more details, including the definition of individual tasks that run within the context of this service. Each one of these tasks represents a single container instance.
Exposing an ECS cluster to external traffic is slightly more involved than it is for the other services we have explored. The cluster is not available to external traffic by default. Instead, we create an AWS application load balancer that routes external traffic to our cluster. This is available as its own resource on EC2.
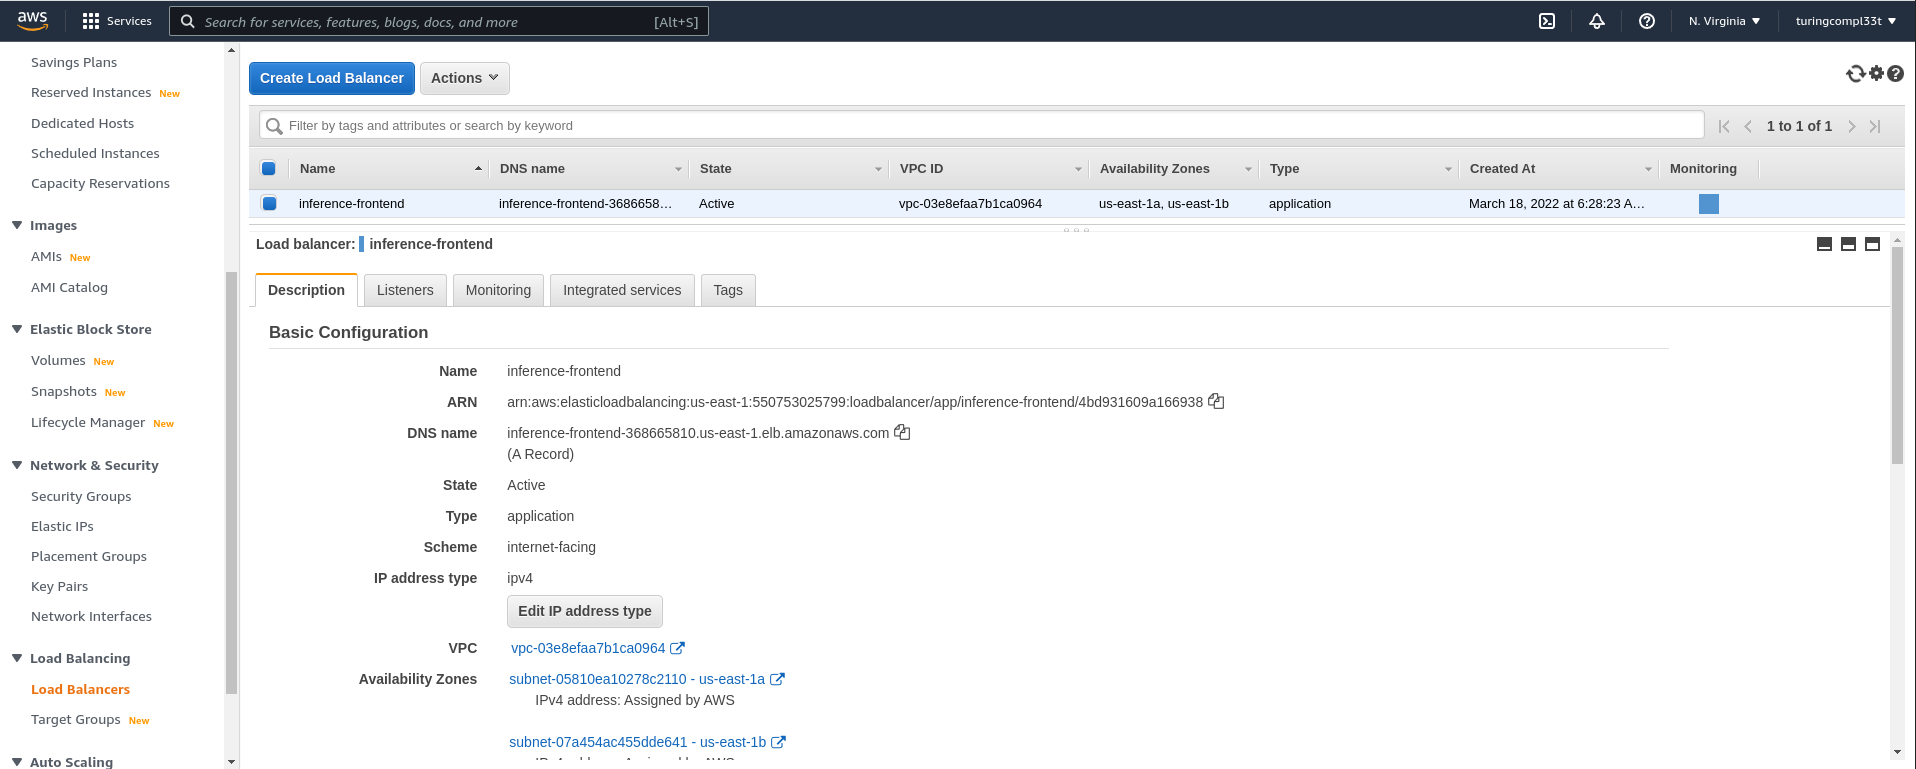
Once we have the DNS name from the load balancer, we can hit the service with requests:
curl http://inference-frontend-368665810.us-east-1.elb.amazonaws.com:8082/recommend/0
ECS is a great option for scalable, production container deployments. It is by far the most configurable and tunable service explored in this post, and is only rivaled by EKS in this regard across all offerings for container deployment on AWS. ECS provides builtin functionality for automatic scaling and deployments, although load balancing must be configured separately as we saw above.
The pricing for ECS is reasonable. AWS does not charge additional fees for ECS clusters, so we only pay for the underlying resources on which our ECS cluster runs. When we couple this with Fargate, we get the cost-saving benefits of serverless computing - we only pay for the resources that we use, and don’t waste money on resources that sit idle. Therefore, ECS combines the efficiency of other serverless computing options like AWS lambda with much greater potential for scalability and configurability.
However, deploying containers on ECS with Fargate is not without its drawbacks, the primary one being the added complexity of setup and management. Management complexity is exacerbated by the fact that ECS does not come with a dedicated community of developers creating tooling that eases the burden. Other options like Kubernetes on AWS EKS have an edge in this regard.
Conclusion ECS container clusters combined with Fargate serverless computing is a powerful and cost-effective combination for deploying container infrastructures. The added complexity of setup and management may not be worth it for development applications or small projects, but for systems that must scale reliably, it is the only offering on AWS that can compete with Kubernetes-based solutions.
Appendix: Preparing a Container
This section provides some additional “technical” background on preparing a container for deployment using the services presented in this post. Specifically, we’ll look at building a container image for our application, and then uploading this image to the AWS elastic container registry (ECR).
The full setup for a containerized application is beyond the scope of this post, but there are many existing tutorials online that walk through this procedure. Here, we will assume that we already have a functioning application that uses a trained machine learning model to perform real-time inference. From here, we need to perform the following high-level steps to build a container image for our application:
- Prepare an appropriate base image (i.e. one that has all of the underlying dependencies)
- Move the source code, trained model, and requirements to the container
- Install inference dependencies in the container
- Run the server
The following dockerfile implements all of these steps, with some comments that identify how they are related to the steps above.
# Prepare the base image; there are many appropriate choices here!
FROM python:3.8-slim-buster
RUN apt-get update \
    && apt-get install -y --no-install-recommends build-essential

# Use /home as the working directory
WORKDIR /home

# Copy the source code to the container FS
ADD src/ /home/src
# Copy the trained model to the container FS
ADD trained_models/ /home/trained_models
# Copy the python requirements to the container FS
ADD requirements.txt /home

# Install Python requirements
RUN pip install -r requirements.txt

# The server listens on port 8082 for incoming connections
EXPOSE 8082

# Run the server
CMD ["python", "src/app.py", "trained_models/"]
With this setup, we can run the following command to build our image locally with the inference tag:
docker build --tag inference .
Pushing to a Private Registry
Now that the container is built, we can upload it to ECR. The following commands assume that you have the following environment variables set in your shell session:
export AWS_ID="<YOUR_ACCOUNT_ID>"
export AWS_REGION="<YOUR_AWS_REGION>"
export REPO_NAME="<YOUR_REPO_NAME>"
First we need to to authenticate the Docker client on our local machine with AWS:
aws ecr get-login-password --region ${AWS_REGION} | docker login --username AWS --password-stdin ${AWS_ID}.dkr.ecr.${AWS_REGION}.amazonaws.com
This command notifies us when authentication succeeds. Now we can create the ECR repository that will store our images:
aws ecr create-repository --repository-name ${REPO_NAME}
Finally, we push the image to the repository:
# Tag the image
docker tag inference:latest ${AWS_ID}.dkr.ecr.${AWS_REGION}.amazonaws.com/${REPO_NAME}:inference-latest
# Push to our private repository on ECR
docker push ${AWS_ID}.dkr.ecr.${AWS_REGION}.amazonaws.com/${REPO_NAME}:inference-latest
Now our container image is available at <AWS_ID>.dkr.ecr.us-east-1.amazonaws.com/<REPO_NAME>:inference-latest and is ready for deployment via the services explored throughout the rest of this post.
Pushing to a Public Registry
Some of the services explored in this post (e.g. Lightsail Containers) require that the container image be deployed to a public image registry. The process for deploying an image to a public registry on ECR is nearly identical to that of deploying to a private registry, but I’ll recapitulate the commands here.
First we need to authenticate with the public registry:
aws ecr-public get-login-password --region ${AWS_REGION} | docker login --username AWS --password-stdin public.ecr.aws
Once we are authenticated, we can create the public repository:
aws ecr-public create-repository \
    --repository-name ${REPO_NAME} \
    --region ${AWS_REGION}
The output of this command specifies the REPOSITORY_URI that we need in the following commands. Finally, we push the image to the repository:
# Tag the image
docker tag inference:latest ${REPO_URI}
# Push to our public repository on ECR
docker push ${REPO_URI}
Setting Up an ECS Service on Fargate
Most of the configuration required for an ECS cluster on Fargate is standard AWS fare (e.g. security groups, availability zones, etc.). The two important resources are the aws_ecs_cluster that defines our cluster and the Fargate definition.
The aws_ecs_cluster resource simply defines the cluster and how its capacity is provided.
resource "aws_ecs_cluster" "cluster" {
  name = "inference-cluster"

  capacity_providers = ["FARGATE_SPOT", "FARGATE"]

  default_capacity_provider_strategy {
    capacity_provider = "FARGATE"
  }

  setting {
    name  = "containerInsights"
    value = "disabled"
  }
}
The fargate module defines most of the details of our service, including the image of the container that will be run as well as the resources allocated to each of these containers.
module "fargate" {
  source  = "umotif-public/ecs-fargate/aws"
  version = "~> 6.0.0"

  name_prefix        = "recommendation-service"
  vpc_id             = data.aws_vpc.default.id
  private_subnet_ids = [data.aws_subnet.east1a.id, data.aws_subnet.east1b.id]

  cluster_id = aws_ecs_cluster.cluster.id

  wait_for_steady_state = true

  desired_count = var.desired_count

  # The image of the container that tasks will run
  task_container_image = var.task_container_image

  # The capacity of individual tasks
  task_definition_cpu    = var.task_definition_cpu
  task_definition_memory = var.task_definition_memory

  task_container_port             = var.task_container_port
  task_container_assign_public_ip = var.task_container_assign_public_ip

  load_balanced = true

  target_groups = [
    {
      target_group_name = var.target_group_name
      container_port    = var.task_container_port
    }
  ]

  health_check = {
    port = var.task_container_port
    path = "/"
  }

  depends_on = [
    module.alb
  ]
}